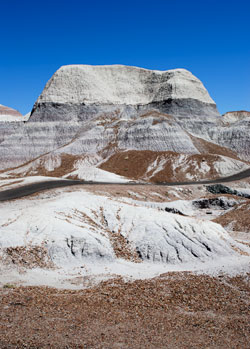
In most instances, the best starting place for framing a photo is to put your main subject on one side or the other. But in this case, the symmetry of the formation cried out for symmetry of framing. Notice the borders of sky and rock at the top and bottom are roughly equal. The amount of sky on each side of the rock are equal. There are equal sized smaller rocks on each side of the big one and there is a large mound in the foreground to balance the main subject. Even the path (which leads straight up a mountain back to the car) has a sort of inverted symmetry to keep the image from looking totally like a geometric pattern. It all works together for an interesting image that looks good in our scrapbook.
So to add some snap to your images, look for symmetry in nature. It’s out there everywhere. It’s usually best to shoot one image symmetrically and one with the subject off center using all the standard rules of framing. You can choose which one you like later. Make sure you have strong composition and a good point of interest. Without one, your shot will probably be dull. Geometric lines, like those on buildings, will look better either perfectly straight or tilted way off level. A little off level will diminish the effect.
Now, is it just me or does the shape of the rock, with the little dip on the right and the path weaving all the way across the bottom, not look like a man’s top hat? Maybe next month’s article will be about hidden shapes in photographs!
Read past articles at www.gregmayo.com. For questions or suggestions, please email [email protected].


